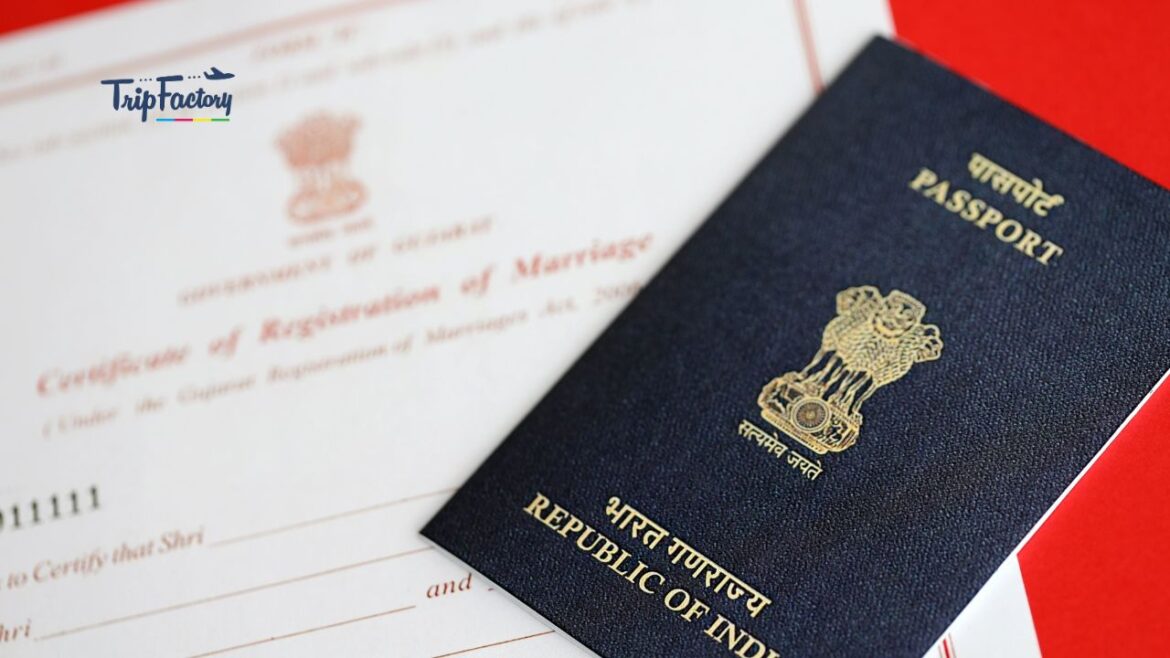
How to Apply for a Passport in India? Applying for a passport in India is very simple if you follow the right steps. First, go to the official website passportindia.gov.in and create an account by using your basic information, email, and password.
Once registered, click to log in and fill out the application form by selecting “Apply for Fresh Passport.” Fill in all the details; you’ll need to pay the application fee (normal ₹1500 tatkal ₹3500 INR) online using UPI, debit card, or net banking.
Next, book an appointment at your nearest Passport Seva Kendra (PSK). On the appointment day, you have to carry all original documents like an Aadhaar card, PAN card, birth certificate, address proof, and school mark sheet, along with a bank statement (6-12 months). A bank statement is not mandatory, but in some cases, they may ask.
If you do not have a bank statement, then that is no problem. At the PSK, your photo, fingerprints, and signature will be captured. After this, a local police officer will visit your home for verification. If all the processes are followed correctly, your passport will be delivered to your address within 7 to 14 working days.
You can track your application status anytime using the ARN (Application Reference Number) on the official website.
How to Apply for a Passport in India
Passport Application Overview 2026
| Category | Details |
|---|---|
| Who Can Apply | Any Indian citizen (infant, minor, adult, senior citizen) |
| Age Limit | No minimum age (even newborns can apply); different forms for minors |
| Educational Qualification | No educational qualification is required |
| Application Mode | Online via passportindia.gov.in |
| Application Types | Fresh, Re-issue, Tatkaal (urgent) |
| Fees (Standard) | ₹1,500 for 36 pages (Normal), ₹2,000 for 60 pages (Normal) |
| Fees (Tatkaal) | ₹3,500 for 36 pages, ₹4,000 for 60 pages |
| Documents Required | Proof of DOB (Birth Certificate), Address Proof (Aadhaar, Utility Bill), ID Proof (PAN, Voter ID), Passport-size photo (optional) |
| Appointment Required | Yes, at the nearest Passport Seva Kendra (PSK) |
| Police Verification | Mandatory (before or after issuance, depending on the case) |
| Processing Time | 7–14 working days (Normal), 1–3 days (Tatkal) |
| Tracking Method | Online using Application Reference Number (ARN) |
| Passport Validity | 10 years (Adults), 5 years or until 18 years (Minors) |
Step By Step Guide to Apply Passport
Thinking about traveling internationally? Or do you just need a passport for your official ID?
Whatever your reason, getting a passport in India is easier than you think. Here are the right steps to apply for a passport online.
In this guide, I’ll walk you through the entire process, explain all the documents you need, and share some pro tips to make it smooth.
Step 1: Go to the Official Passport Website
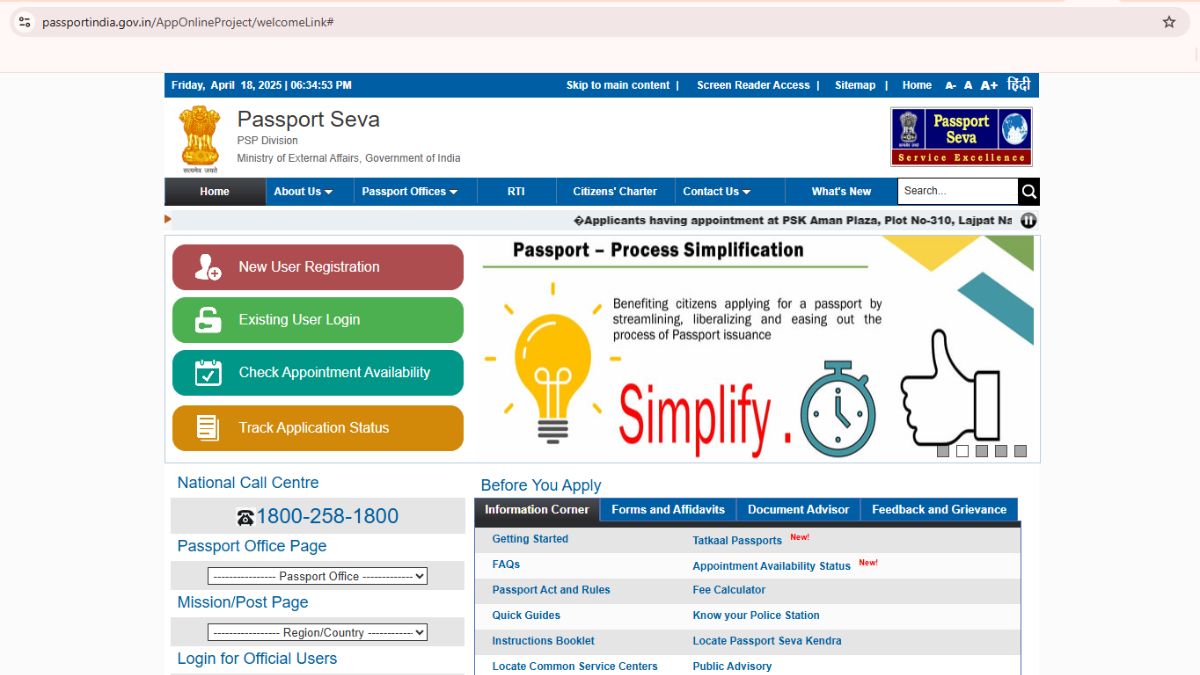
First visit to the official website: passportindia.gov.in. This is the only valid portal through which you can apply for an Indian passport online. Bookmark it. You’ll be visiting it a few times during the process.
Once you’re on the homepage, click on “New User Registration”. Fill in your basic details — name, email, date of birth, and create a strong password.
Pro Tip: Use the same email ID that you frequently check. All passport updates come here!
Step 2: Fill out the Online Passport Application Form
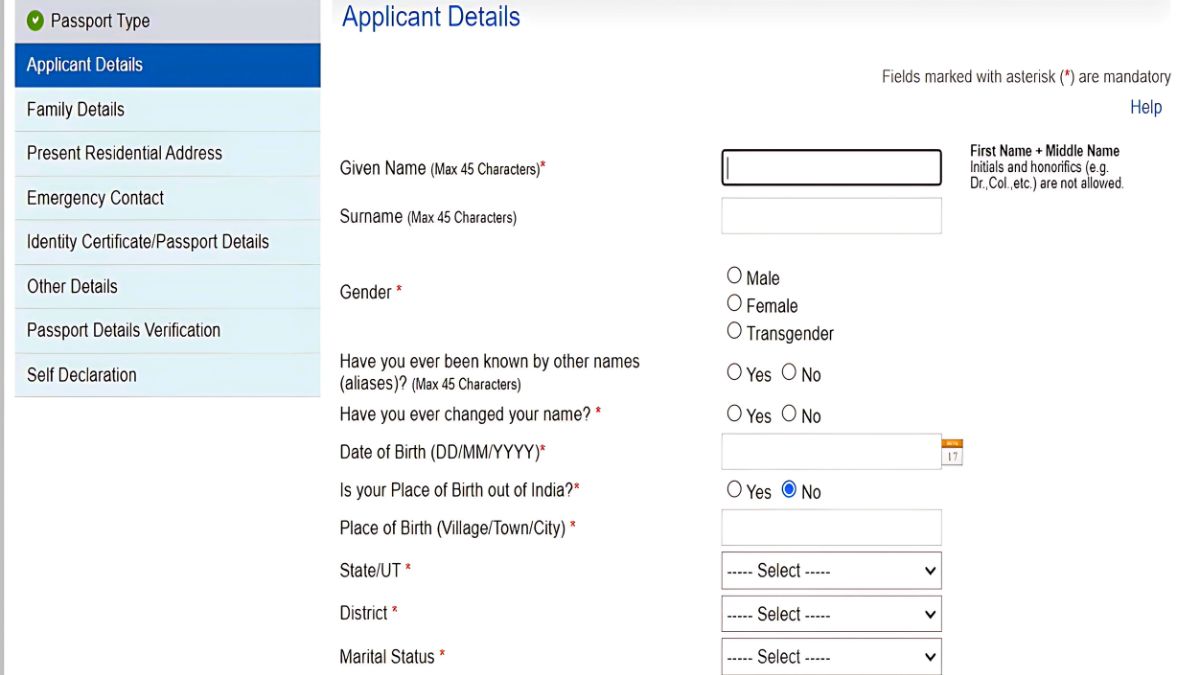
After registration, log in to the site and go to the tab that says “Apply for Fresh Passport/Re-issue of Passport.” Next, select the RPO (Regional Passport Office) by choosing your state and district. Then, proceed to the passport type section.
Choose “Fresh Passport” and select “Normal” as the type of application. You can also choose the Tatkal option if you need the passport urgently (within 1–3 days), but I recommend the Normal option—it takes around 5–7 days and costs approximately ₹1500, while the Tatkal option costs ₹3500.
For the booklet type, choose 36 pages if you don’t travel internationally often, or 60 pages if you travel frequently.
You’ll now see an online form, so take your time to fill it out correctly.
What will they ask?
- Given Name (as per your ID)
- Surname
- Gender
- Have you ever been known by other names?
- Have you ever changed your name?
- Date of birth
- Place of birth
- Sate
- District
- Marital Status
- Citizenship of India (choose Birth if you were born in India)
- Pan, Voter ID (If Available)
- Employment type
- Parent or Spouse Government Servant or not?
- Education Qualification
- Is the applicant eligible for the non-ECR category? (To check if the applicant is eligible for the Non-ECR category, ask: Has the applicant passed at least the 10th class? If Yes – The applicant is eligible for Non-ECR. And if answer is No – The applicant will fall under the ECR category and may need extra permission to work abroad. So, if the person has passed 10th class or more, they are Non-ECR eligible.)
After that, click on I agree and save my details, and then next.
Step 3: Fill in the Family Details
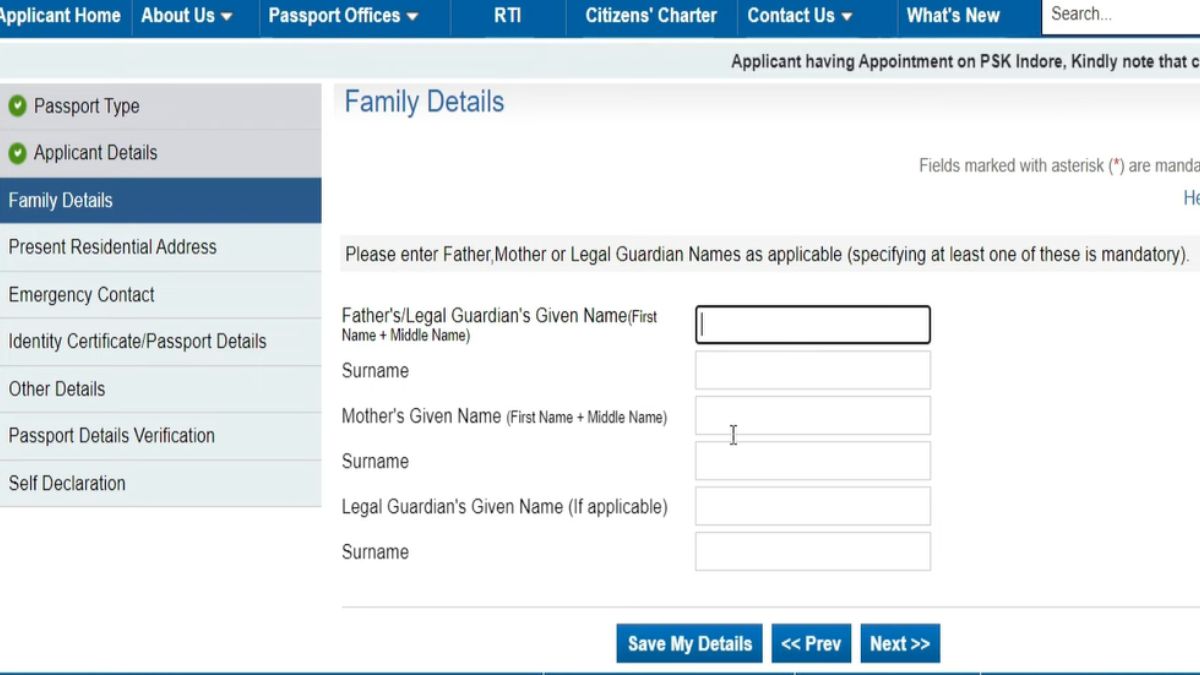
This section is very important, and you should fill it in correctly, especially if you’re applying for a passport for the first time or a minor.
What should you fill in?
- Father’s / Legal Guardian Given Name (in this field, put your Father’s last name and also middle name if available; for Eg. if your Father’s name is AMIT KUMAR SARMA, then your fill in AMIT KUMAR)
- Surname (in this field, put your Father’s Surname name Eg. Your father’s name is AMIT KUMAR SARMA, then fill in SARMA, but if your Father doesn’t have any surname or last name, just leave it blank)
- Mother’s Given name (First Name & Middle Name)
- Legal Guardian’s Name (if applicable)
- Spouse’s Given name and Surname (if you married)
After filling it in correctly, Click save my details and next
Step 4: Fill in the Present Residential Address Details
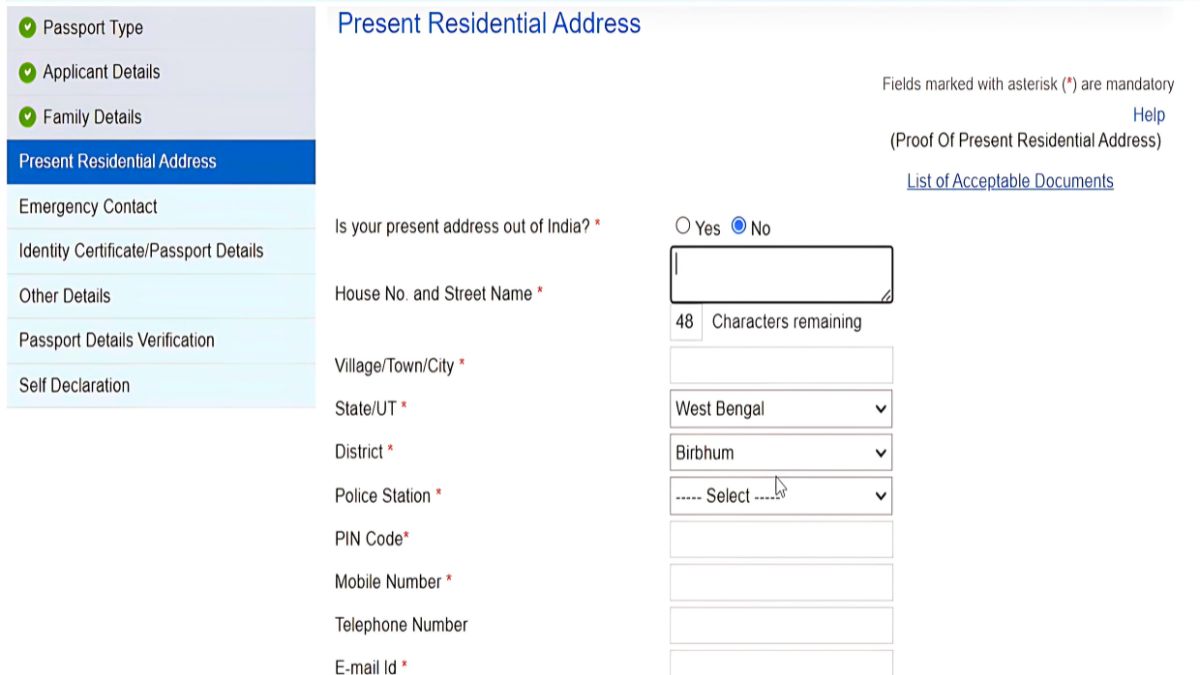
Now it’s time to fill in your Current Residential address. This is important because your passport will be sent here, and the police will also visit this place to check your details. So, just make sure you write the address correctly and clearly.
What you have to fill
- Is your present address out of India? choose No
- House no. and Street Name (In this section, you need to fill in your address according to your Aadhar card or other Govt. Issue ID card . Fill as it is written on your ID card)
- State
- District
- Police Station
- PIN Code (e.g.: 110001)
- Mobile Number
- Email Id
- Is a permanent address available? Choose Yes
- Then select yes if your permanent address and present address are the same. If not, then select no.
And then again, Click save my details and next.
Step 5: Fill the Emergency Contact
In this part of the form, you’ll be asked to share details of someone who can be contacted if there’s ever an emergency related to your passport. Don’t worry this doesn’t mean something bad will happen. It’s just a safety step that helps the passport office reach out to a trusted person if needed.
You can choose anyone close to you, like your mother, father, spouse, brother, sister, or a good friend. Make sure this person is someone you trust and who can be reached easily.
- You Need to fill
- Name and Address
- Mobile Number
- Email Id
Again, save details and next
Step 6: Fill Identity Certificate/Passport Details
- Have you ever held/held any Identity Certificate? (Choose No, An Identity Certificate (IC) is a travel document given mainly to Tibetan refugees and stateless people living in India. It acts as their ID and lets them travel abroad when they don’t have a national passport.).
- Details of Previous / Current Diplomatic / Official Passport (Choose Details not available, Never Held Diplomatic/Official Passport )
- Have you ever applied for a Passport, But not Issued? (Choose No, if you do not applied and if applied but were not issued, then click yes and fill in the file no, application date, and passport office name)
Click save my details and next.
Step 7: Provide Criminal Proceedings
This section is about your legal background, and it’s really important to answer truthfully, but don’t worry if you have nothing to declare.
The form will ask whether you’ve ever been:
- Involved in any criminal case
- Arrested, convicted, or sentenced by a court
- Denied or had a passport impounded
- Facing any pending court cases
If none of these apply, simply select “No” to all and move to the next step. For most people, this will be a quick and easy part of the form.
Step 8: Passport Preview Details
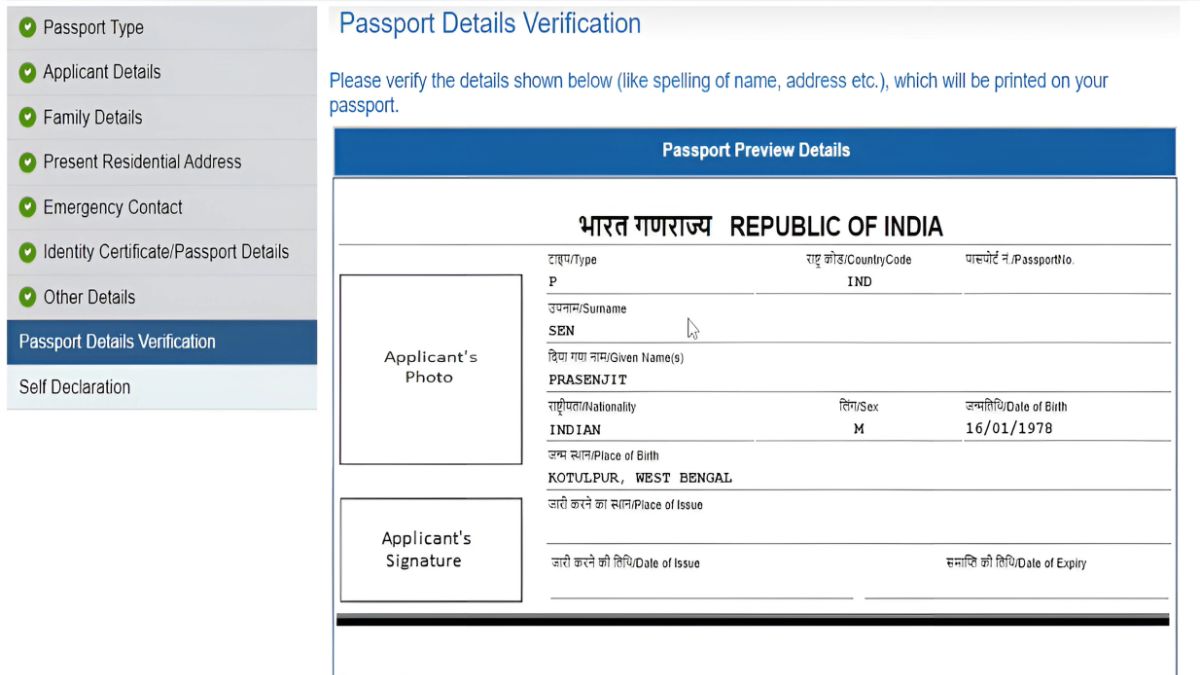
Before you submit the form, the system will show you a Passport Preview with the information you entered. This is your last chance to check and confirm all the details carefully.
Take your time here. Go through each field slowly and make sure everything is correct.
If something is wrong or missing, click the “Edit or Previous” button to fix it. Even small mistakes like a spelling error in your name or a wrong PIN code can delay police verification or passport delivery.
Step 9: Self Declaration
In this section, you have to choose two things
- Proof of Birth (Select from The Dropdown Eg: Birth Certificate, PAN card, voter ID Card, Driving Licence)
- Proof of Present Address (Select from The Dropdown Eg, Birth Certificate, Aaddhar Card, Bank Passbook, Voter card, Driving Licence)
After that, fill in the place name and date click I agree and preview application From, and take a printout or save a pdf for future. And then click submit.
Now you can see an ARN number. Note this number; you can schedule an appointment with the passport office. For that, click pay and schedule appointment. Now click the payment method (UPI/NET BANKING / DEBIT CARD).
Then you can select the passport office where you have to make an appointment and choose the nearest PSK or POPSK (It looks like there’s a little confusion. PSK and POPSK both handle passport work. The only real difference is where they’re located. PSKs are full passport offices, while POPSKs are a type of Passport Seva Kendra located within post offices, which can be more convenient for some people).
Step 9: This is the Final
In this step, you can choose your flexible date for an appointment
Choose the date click pay and book an appointment, then select the payment method (UPI/ DEBIT CARD/ NET BANKING / CREDIT CARD) and pay (1500/- for Normal Passport for 36 pages); after successful payment, it will redirect to the page where you will get an online appointment Receipt, you can see the details and also the address of passport office.
You can upload supporting documents like address proof, date of birth proof, or others. If you select the previous date of birth proof or address proof , birth certificate or pan card, then here you have to select the same and upload (Not Compulsory).
| Passport Type | Booklet Size | Service Type | Fee (INR) | Validity |
|---|---|---|---|---|
| Fresh/Re-issue | 36 Pages | Normal | ₹1,500 | 10 Years |
| Fresh/Re-issue | 60 Pages | Normal | ₹2,000 | 10 Years |
| Fresh/Re-issue | 36 Pages | Tatkal | ₹3,500 | 10 Years |
| Fresh/Re-issue | 60 Pages | Tatkal | ₹4,000 | 10 Years |
Note: When applying Tatkal, you have to pay 1500/- online and the remaining amount paid at the Passport Office
Visit the Passport Seva Kendra (PSK)
On the day of your appointment, try to reach the Passport Seva Kendra (PSK) at least 15–30 minutes early. It helps to avoid any last-minute stress.
Don’t forget to carry:
- Your printed appointment receipt
- A valid ID proof
- Your original documents (and copies)
Also, wear simple clothes because your photo will be taken inside for the passport.
What Happens Inside the PSK?
Once you enter the PSK, here’s how things usually go:
- Counter A: Your documents are checked, and you’ll get a token number.
- Counter B: Your photo, fingerprints, and digital signature will be taken.
- Counter C: A passport officer will review everything and give final approval.
- Exit Counter: You’ll get a receipt and a message that your visit is complete.
Tip: The entire process usually takes 1–2 hours, depending on the crowd. Just be patient and follow the staff instructions — they’ll guide you at every step.
Police Verification
After your PSK visit, your details will be sent to the local police station for verification.
Here’s what usually happens:
- A police officer will either visit your home or call you to the police station
- They’ll verify your documents and ask for signatures.
- You may need to give photos and address proof again
- Be polite and pick up unknown calls to avoid delays
Mistakes You Should Avoid
Sometimes, small things can cause big delays. Here are a few simple things you should avoid:
- Uploading the wrong documents or blurry images
- Spelling mistakes or wrong date of birth in the form
- Missing your appointment or arriving too late
- Giving a wrong or fake address (police will check this!)
In my personal experience, if there was a small mistake in spelling or address or whatever, they can reject your application.
| Passport Type | Cover Color | Who Can Apply | Purpose of Travel | Special Notes |
|---|---|---|---|---|
| Ordinary Passport | Blue | General public (all Indian citizens) | Holiday, work, study, visiting family abroad | Most commonly used passport |
| Official Passport | White | Government employees only | Travel for official government work | Not for regular citizens, issued for government work |
| Diplomatic Passport | Maroon | High-ranking officials (e.g., diplomats, ambassadors) | Representing India in other countries on official duty | Comes with special privileges, not for public use |
Why Do You Need a Passport?
A passport is more than just a travel document. It is a very important proof of your identity and nationality. If you are planning to go outside India for any reason, a passport is the first thing you’ll need.
Here are some common reasons why people apply for a passport:
1. For International Travel
You need a passport to visit any foreign country, whether it’s for a short holiday, a family visit, or a business trip. Without a passport, you cannot travel internationally.
2. To Study Abroad
Many students apply for a passport to go to colleges and universities in other countries. It’s required while applying for a student visa.
3. For Work Opportunities
If you get a job in another country, you must have a passport to apply for a work visa and travel legally. Many professionals, especially in IT, nursing, or construction, need it for overseas jobs.
4. As a Valid ID Proof
A passport is accepted as a strong identity and address proof in many official places. It can help with things like opening a bank account, applying for a visa, or even checking in at some hotels.
5. For Emergency Situations
Sometimes, people need to travel urgently, maybe for medical reasons. Having a passport ready can save time in urgent situations.
Required Documents for Passport Application
| Document Type | Examples | Why It’s Needed |
|---|---|---|
| Proof of Date of Birth | – Birth Certificate – 10th Class Marksheet – PAN Card – Aadhaar with DOB | Confirms your date of birth |
| Proof of Address | – Aadhaar Card – Electricity Bill – Rental Agreement – Voter ID | Confirms where you live (for delivery & police check) |
| Proof of Identity | – PAN Card – Aadhaar Card – Driving License – Voter ID | Confirms who you are |
| Photograph (if required) | – 2 recent passport-size photos (only if PSK doesn’t take them digitally) | For printing on your passport |
| Optional / Extra Documents | – Marriage Certificate (if recently married) – Annexure/Affidavit (if special cases) | Only for specific situations |
How to Track Your Passport Application
After your appointment and police verification are done, you might start thinking about, “When will I get my passport?” Don’t worry . You can check the status online anytime.
Here’s how you can track it:
- Go to the official website: passportindia.gov.in
- Click on “Track Application Status.”
- Choose the right option (“Passport/PCC/IC”)
- Enter your Application Reference Number (ARN) and your date of birth.
- Click on the button to see the status.
That’s it! Now you can see what’s happening with your passport, whether it’s under review, printed, or on the way to your home.
If it’s dispatched, you’ll also get a Speed Post tracking number so you can track the exact location from India post website by track with the tracking Number.
Conclusion: Getting a Passport is Easy if You Know the Steps
Getting a passport in India may feel confusing at first, but once you know the steps, it’s actually quite simple. You just need to fill out the form correctly, keep your documents ready, visit the Passport Seva Kendra on time, and complete police verification. That’s it.
Everything can be done online, and the process is faster and smoother than most people think. If you follow each step carefully and stay honest in your application, you can get your passport in just a few days.
So whether you’re planning to travel for a holiday, job, study, or any other reason, don’t wait. Start your passport process today and take your first step toward exploring the world.
Frequently Asked Questions
Who can apply for a passport in India?
Any Indian citizen can apply for a passport, whether for the first time, renewal, or re-issue. For minors (below 18 years), parents or guardians must apply on their behalf.
How do I apply for a passport for the first time?
First, register on the Passport Seva Portal, fill out the online application form, pay the fee, schedule an appointment at a Passport Seva Kendra (PSK) or POPSK, and attend the appointment with all necessary documents.
What documents are needed for a fresh passport application?
Generally, you need:
Proof of Date of Birth (like Birth Certificate or Aadhaar with DOB)
Proof of Address (like Aadhaar Card, Voter ID, Utility Bills)
Citizenship proof if required
Recent passport-size photographs (in some cases)
How much does it cost to apply for a passport in 2026?
₹1,500 for a 36-page passport (normal processing)
₹2,000 for a 60-page passport
Additional ₹2,000 if you choose Tatkaal (urgent) processing.
Can I apply for a passport without an Aadhaar card?
Yes, Aadhaar is helpful but not mandatory. You can provide other valid documents like a Voter ID, PAN card, or utility bills for address and identity proof.

